Intel® Ethernet FCoE Boot allows the user to install FCoE to boot an operating system from a remote target. The following information refers specifically to FCoE Boot. To then configure the OS go to: Windows or Linux.
Upgrading an FCoE-Booted System
Intel® Ethernet FCoE Boot Option Rom Setup
Microsoft* Windows* Setup for Intel® FCoE Boot
Installing Windows 2008 With Local Disk
The Windows FCoE stack and the FCoE Option ROM have recently changed the way they create the initiator WWPN. The first two bytes of the WWPN previously contained a 2 followed by the FCoE fabric VLAN ID. The VLAN ID is no longer added to the WWPN and the first two bytes will now always be 20:00.
If you are upgrading the Windows FCoE stack from Release 15.4, then Windows will fail to boot if you do not zone the new WWPN. Use the following steps to perform the upgrade. You only need to perform the following upgrade if you have previously installed the Windows FCoE stack.
- If you want to upgrade the Option ROM from within Windows:
- Upgrade the Windows FCoE stack. Ignore any suggestions to restart the system.
- Upgrade the Option ROM using Intel® PROSet for Windows* Device Manager.
- Restart the system.
To configure Intel® Ethernet FCoE Boot, power-on or reset the system and
press the Ctrl-D key when the message "Press <Ctrl-D> to run setup..."
is displayed. After pressing the Ctrl-D key, you will be taken to the Intel®
Ethernet FCoE Boot Port Selection Setup Menu.
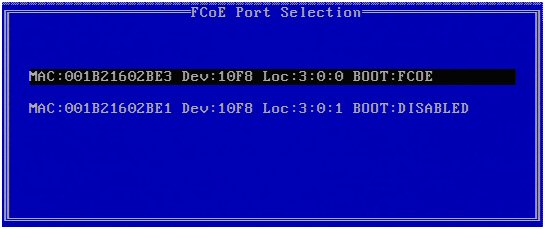
The first screen of the Intel® Ethernet FCoE Boot Setup Menu displays a list of Intel® FCoE Boot-capable adapters. For each adapter port the associated SAN MAC address, PCI device ID, PCI bus/device/function location, and a field indicating FCoE Boot status is displayed. Up to 10 FCoE Boot-capable ports can be displayed within the Port Selection Menu. If there are more Intel® FCoE Boot-capable adapters, these are not listed in the setup menu.
Highlight the desired port and press Enter.
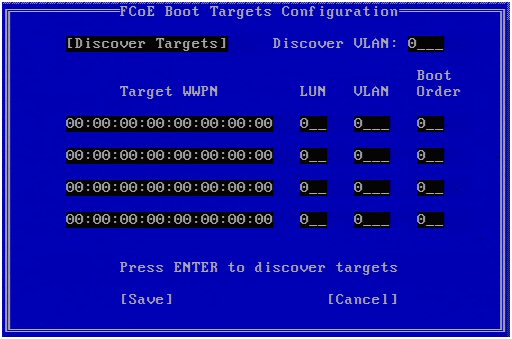
FCoE Boot Targets Configuration: Discover Targets is highlighted by default. If the Discover VLAN value displayed is not what you want, enter the correct value. Highlight Discover Targets and then press Enter to show targets associated with the Discover VLAN value. Under Target WWPN, if you know the desired WWPN you can manually enter it or press Enter to display a list of previously discovered targets.
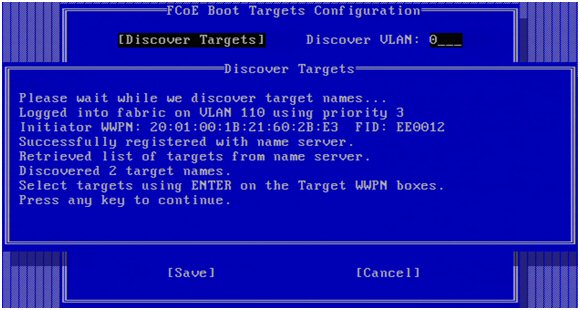

Highlight the desired Target from the list and press Enter.
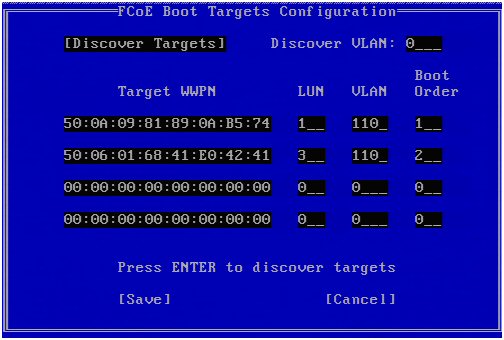
Manually fill in the LUN and Boot Order values.
Boot Order valid values are 0-4, where 0 means no boot order or ignore the target. A 0 value also indicates that this port should not be used to connect to the target. Boot order values of 1-4 can only be assigned once to target(s) across all FCoE boot-enabled ports.
VLAN value is 0 by default. You may do a Discover Targets which will display a VLAN. If the VLAN displayed is not the one you require, enter the VLAN manually and then perform Discover Targets on that VLAN.
Hit Save.
| NOTE: After the Discover Targets function is executed, the Option ROM will attempt to remain logged into the fabric until the FCoE Boot Targets Configuration Menu is exited. |
Keyboard Shortcuts: Up/Down, TAB and SHIFT-TAB to move between the controls. Left/Right/Home/End/Del/Backspace in the edit boxes.
Press the Esc key to leave the screen.
Many of the functions of the Intel® FCoE Boot Port Selection Setup Menu can also be configured or revised using Intel® PROSet for Windows Device Manager. Click here for instructions on installing and using Intel® PROSet for Windows Device Manager.
|
|
Warning: Upgrading or uninstalling driver will
cause blue screen Upgrading or uninstalling the network adapter driver via Windows Device Manager on the boot port will result in a lost connection to the SAN. The lost connection will result in a Windows blue screen on the next boot and will require the OS to be reinstalled. |
Follow installation steps to install the Intel® Ethernet FCoE Boot-capable adapters with Intel® Ethernet FCoE Boot firmware support.
Create a disk target (LUN) on an available Fibre Channel target. Configure this LUN to be accessible to the WWPN address of the initiator of the host being booted.
Make sure the FCoE initiator of the host system starts the Intel® Ethernet FCoE Boot firmware. The firmware should be configured properly, be able to connect to Fibre Channel target, and detect the boot disk. Refer to the troubleshooting page if the firmware is not able to connect to target.
To setup Windows Server* 2008 boot system when a local disk is available, follow the steps in installing Windows 2008 with Local Disk.
Obtain information on Crash Dump Support.
|
|
Warning: Upgrading or uninstalling driver will
cause blue screen Upgrading or uninstalling the network adapter driver via Windows Device Manager on the boot port will result in a lost connection to the SAN. The lost connection will result in a Windows blue screen on the next boot and will require the OS to be reinstalled. |
After the Option Rom is installed, if you wish to install Windows 2008 with local disk, do the following:
Follow the instructions for installing Windows 2008 and the FCoE stack.
Verify that the FCoE boot disk is available in the Fabric View tab of Intel® PROSet for Windows Device Manager, and verify that you are online using Windows Disk Manager.
Open a command prompt, run the fcoeprep.bat batch file. To find the batch file, navigate to your architecture's directory within the \APPS\FCOEBOOT directory.
Shut Windows down and capture the OS image to a local disk partition.
Transfer the image from the local hard drive to the FCoE target. This may be done from within the local Windows installation.
For Windows 2008 R2 only: Run bcdboot.exe from the local Windows installation to make the FCoE disk bootable.
If a System Reserved partition exists on the FCoE disk, type:
bcdboot F:\Windows /s E:
where E: is the FCoE System Reserved partition and F: is the FCoE partition with the Windows directory.
If a System Reserved partition does not exist, type:
bcdboot E:\Windows /s E:
where E: is the FCoE partition with the Windows directory.
Shut down and remove the local disk.
Configure the system BIOS to boot from the FCoE disk and boot.
Crash dump file generation is supported in this release.
Last modified on 12/10/10 3:03p Revision 32